---
Source: https://docs.microblink.com/platform/img-selfie-match
Title: Match face images against selfies
Description: Create workflows to match database face images against live selfie verification
---
# How to match a face image against a selfie?
Let's say that you have a database of face images, and that you want to perform a selfie match against those images, to check if your user matches the photo you have on record.
This could be used when changing very sensitive data, or as an additional verification step for transactions involving large sums of money.
## Creating a workflow
### Configuring the initialization step
As usual, you'd start by creating a workflow in your organization.
First you'll need to set up the initialization step to support additional forms.
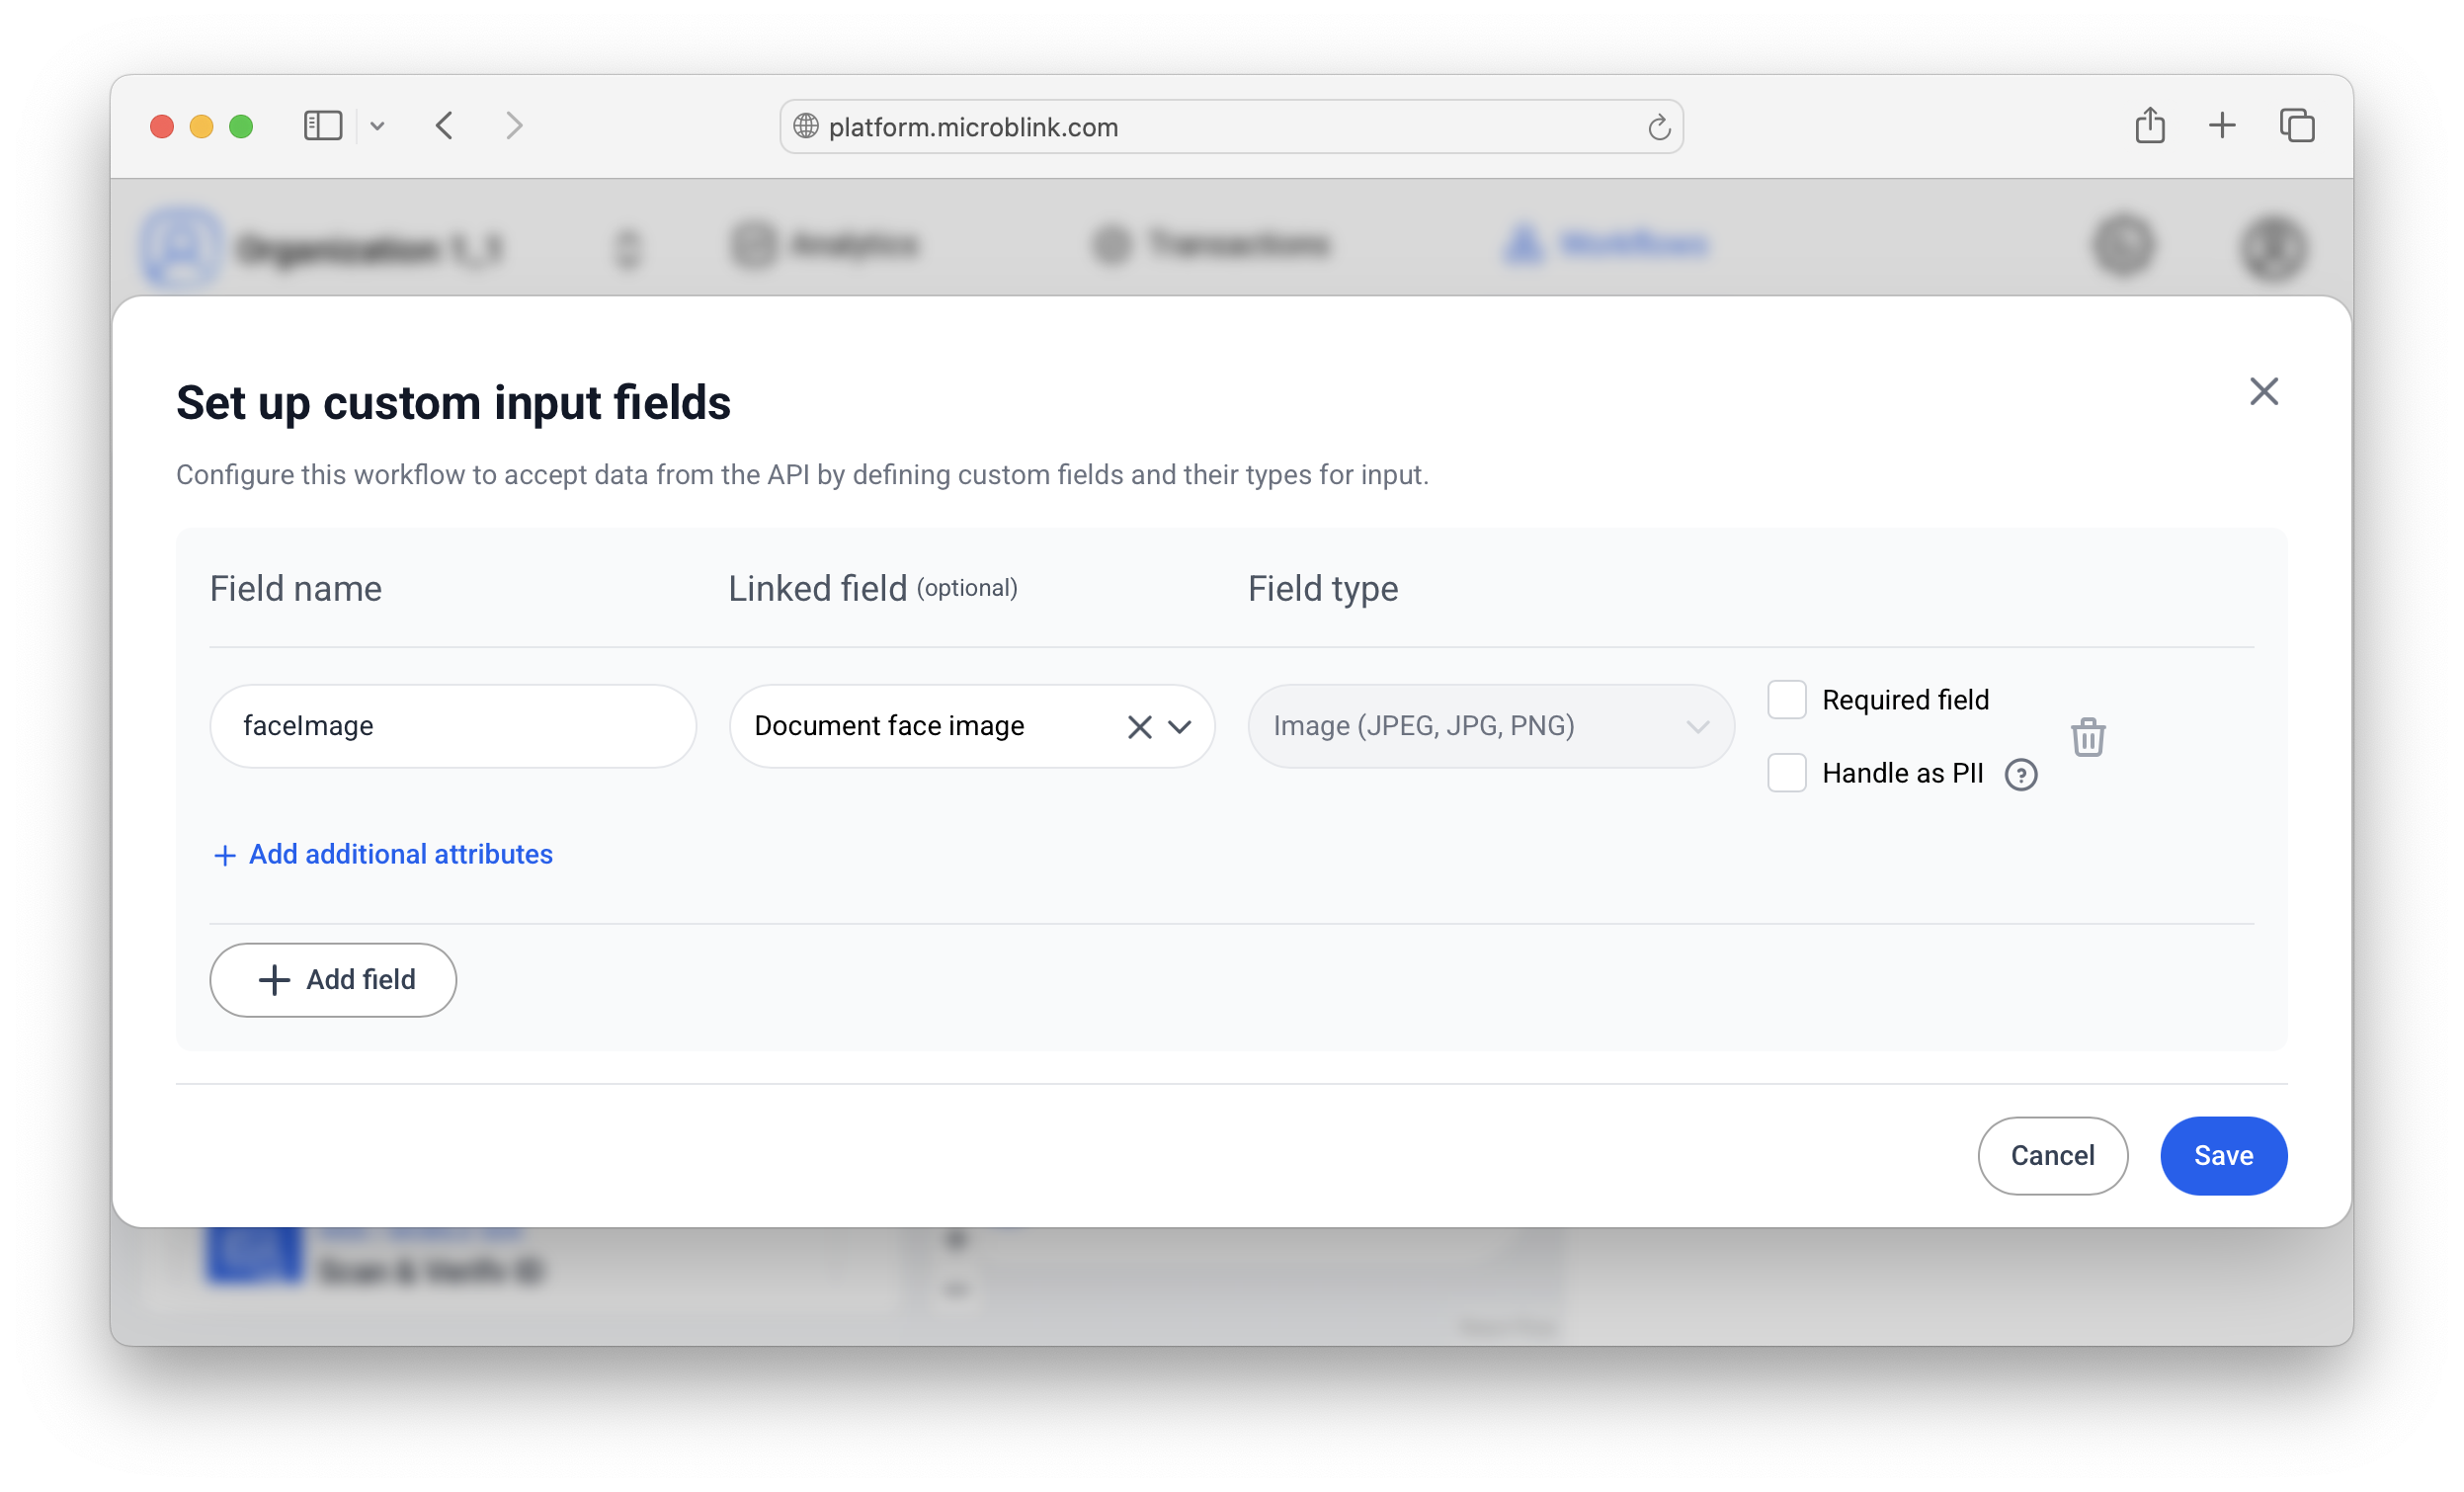
The way to configure the [initialization step](./capabilities/initialization-step.md) is to:
1. Add a field name. In this tutorial we'll use `faceImage`.
2. **Add a linked field.** This is important, and it's important to set it to
**Document face image**. Alternatively, if you have numerous images of documents
(not just faces!) you could use "Raw document image front".
3. Mark the field as required and/or personally identifiable information. This is
optional, but good practice.
### Adding the selfie capability
The workflow could involve more steps if you need them, but to just perform a selfie (biometric) check, only one step is required: [selfie, liveness & face match](./capabilities/selfie-face-match.md).
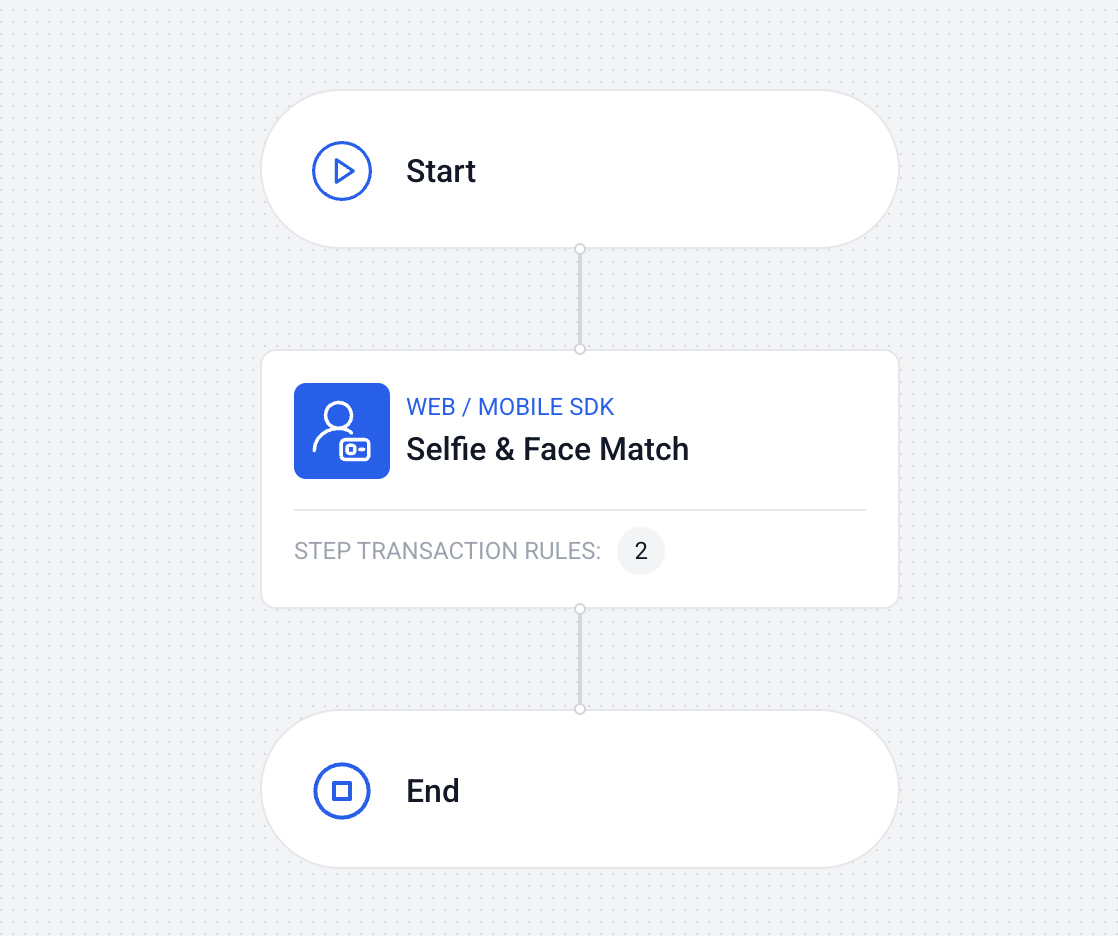
Configure the capability to be as sensitive as you like.
If in doubt, leave the default values, and tune based on real world feedback.
## Using a proxy to provide face images
After you've published your workflow, it's ready to be used.
The workflow will expect to find a face image in the initialization step.
There are two ways to provide this image, and only one of them is safe: using a [proxy](./proxy.md).
The essential logic is this:
1. A user has to perform a face image vs. selfie check.
2. They open your workflow.
3. The SDK starts a workflow by first contacting the proxy (as always).
4. The proxy adds the face image to the original request body.
5. The proxy sends this new request body to the Agent API.
6. The Agent API returns an address to the SDK where the SDK can continue with the rest of the transaction (selfie capability).
We'll dive into the specifics, but one key thing is to configure the proxy to know when it should inject face images, and when it should use the default behavior (authentication against the Agent API and pass-through).
:::danger[What's the unsafe way?]
You could, in your web app (or iOS app, or Android app), add the face image and send it as any other request.
This greatly simplifies the architecture at the cost of safety.
The reason why it's unsafe is that any end user can inspect the image you've provided them, and then simply replace the image with their own.
They would then send the modified image, and the selfie biometric check would report a match between them and their modified image.
Therefore, the biometric check doesn't really accomplish a biometric verification between the **picture you have on record** and the actual end user using the application.
Moreover it's more complicated if you do it this way.
You would have to have a logic that sends the picture to each of the available platforms.
Conversely, using the proxy method, the SDKs require no interventions, and all the additional logic happens in the proxy that you control.
:::
## Creating a proxy that injects images
In this tutorial we'll use [Netlify Functions](https://www.netlify.com/platform/core/functions/) to serve as an example transaction proxy, but you could accomplish this with any proxy setup, including [our own showcase proxy](https://github.com/MicroblinkPlatform/microblink-platform-transaction-proxy).
We'll mostly focus on the data that needs to be passed, since there are many ways to create and operate a proxy, and use the Netlify Functions example to illustrate specific points.
### Initial request and image format
The Agent API expects the initial request to look something like this:
```json {6-8}
{
"workflowId": "string",
"platform": "string",
"sdkVersion": "string",
"consent": {},
"formValues": {
"faceImage": "base64-encoded image"
}
}
```
Notice two things:
- There are other fields in the request, some of which are required, and others optional.
See the [reference](/platform/api/agent#tag/transaction/GET/api/v1/transaction/{transactionId}) to see the full body.
- The final expected request contains a **formValues** object, which then contains a **faceImage** key.
The "faceImage" key is what you called your field when you created the workflow, so this could be different, if you named it differently.
In this setup, you'll allow your SDK to send *all* the other fields *except* the **formValues** field.
(You could also send the formValues field in the SDK, and then append data inside.)
:::important
The proxy has to be set up to receive the initial payload from the SDK, and to then,
according to some logic that you control, append this object:
```
"formValues": {
"faceImage": "base64-encoded image"
}
```
The final combination (initial request + your appended data) is then passed to the
Agent API.
:::
### The image has to be base64-encoded
The image is passed as a string to the `faceImage` parameter (or whichever name you
selected when creating the workflow).
Note that this is a really long string.
Some providers, like Netlify, won't allow a string exceeding a specific number of characters (like 5000) to be used as an environment variable.
The better way to do it is to Base64-encode the image on-the-fly, inside the code for your proxy server, and based on some user-identifying logic.
For example:
1. User is prompted to go through a workflow.
2. A specific workflow ID is sent in the user's (SDK) request to the proxy.
3. Based on the `workflowId` value (which identifies this workflow as the kind that
requires face image injection), and on the `consent.userId` field (which uniquely
identifies the user), the proxy server fetches the face image from external
storage.
4. The proxy server then base64-encodes that image, and adds it to the new request.
5. The proxy server sends the new request to the Agent API.
#### Initial request
```json {2,7}
{
"workflowId": "string", // uniquely identifies this workflow as the "injecting" kind
"platform": "None",
"sdkVersion": "string",
"props": {},
"consent": {
"userId": "string", // uniquely identifies the user (to fetch the right image)
"note": "string",
"givenOn": "2024-07-29T15:51:28.071Z",
"isProcessingStoringAllowed": true,
"isTrainingAllowed": true
}
}
```
#### Final request
```json {6}
{
"workflowId": "string",
"platform": "None",
"sdkVersion": "string",
"formValues": {
"faceImage": "base64-encoded image" // after fetching and encoding the image, it's passed here
},
"props": {},
"consent": {
"userId": "string",
"note": "string",
"givenOn": "2024-07-29T15:51:28.071Z",
"isProcessingStoringAllowed": true,
"isTrainingAllowed": true
}
}
```
## Implementation example in Netlify Functions
:::warning
This is a bare-bones example; use it as a starting point to illustrate the main
concepts, then add authentication logic. Don't end up in a situation where a
malicious user can manipulate the `userId` value to obtain other images than those
they have the right to access; implement additional controls which cannot be tampered
with.
:::
### Repo structure & mapping
In your repo, create a `netlify/functions/proxy.js` file, together with a
`netlify.toml` file. Optionally, use an `.env` file to keep local environment
variables, for local development.
For `netlify.toml`, add this content:
```toml
[[redirects]]
from = "/agent/*"
to = "/.netlify/functions/proxy"
status = 200
force = true
```
It ensures that your proxy function is called when you call the proxy server.
### Setting up CORS headers
This section ensures that the SDK can access the resources on your proxy.
```js
exports.handler = async (event, context) => {
// CORS headers for all responses
const corsHeaders = {
'Access-Control-Allow-Origin': '*',
'Access-Control-Allow-Headers': 'Content-Type, Authorization, X-Requested-With',
'Access-Control-Allow-Methods': 'GET, POST, PUT, DELETE, OPTIONS',
'Access-Control-Max-Age': '86400'
};
// Handle preflight requests
if (event.httpMethod === 'OPTIONS') {
return {
statusCode: 200,
headers: corsHeaders,
body: ''
};
}
```
### Getting configuration values
```js
try {
const TARGET_URL = process.env.TARGET_URL;
const MB_CLIENT_ID = process.env.MB_CLIENT_ID;
const MB_CLIENT_SECRET = process.env.MB_CLIENT_SECRET;
const FACE_IMAGE_BASE64 = process.env.FACE_IMAGE_BASE64 || require('./face-image.js');
```
The `face-image.js` file here is used as another example how you might keep a face
image (it could be stored in a separate file, that has its separate logic on how it's
updated). Since there's a large number of ways this can be done, it's not described
here in detail.
### A word on authentication
Like with any request towards the Agent API, you'll need to authenticate using your `client_id` and `client_secret` as described in the [Authentication](./api/authentication.md) guide.
This is no different in the "injection" use case; whichever proxy authentication
setup you normally use will work here as well.
### Base-64 encoding on the fly
```js
if (parsedBody.userId) {
const faceImageId = `user-${parsedBody.userId}-face`; // Or use a hash/mapping
const imageUrl = `${process.env.IMAGE_STORAGE_URL}/${faceImageId}`;
try {
const imageResponse = await fetch(imageUrl);
if (imageResponse.ok) {
const imageBuffer = await imageResponse.arrayBuffer();
faceImage = Buffer.from(imageBuffer).toString('base64');
}
} catch (err) {
console.error('Failed to fetch face image for user:', parsedBody.userId, err);
}
```
Note that this requires authentication towards the "IMAGE_STORAGE_URL" provider.
The original calling user should only be able to access images of themselves, not of any other user.
This authentication is not described here, as it's out of scope, but it is necessary.
### Injecting the content and forwarding the request
```js
parsedBody.formValues = {
faceImage: faceImage
};
body = JSON.stringify(parsedBody);
```
This body now contains the Base64-encoded image and it can be sent to the Agent API.
```js
const targetHeaders = {
'Content-Type': event.headers['content-type'] || 'application/json',
'User-Agent': event.headers['user-agent'] || 'netlify-proxy'
};
if (MB_CLIENT_ID && MB_CLIENT_SECRET) {
targetHeaders.Authorization = "Basic " + Buffer.from(`${MB_CLIENT_ID}:${MB_CLIENT_SECRET}`).toString('base64');
}
const response = await fetch(TARGET_URL, {
method: event.httpMethod,
headers: targetHeaders,
body: body
});
```
### Full annotated example
Open to see the full proxy.js file
```js
exports.handler = async (event, context) => {
// CORS headers for all responses
const corsHeaders = {
'Access-Control-Allow-Origin': '*',
'Access-Control-Allow-Headers': 'Content-Type, Authorization, X-Requested-With',
'Access-Control-Allow-Methods': 'GET, POST, PUT, DELETE, OPTIONS',
'Access-Control-Max-Age': '86400'
};
// Handle preflight requests
if (event.httpMethod === 'OPTIONS') {
return {
statusCode: 200,
headers: corsHeaders,
body: ''
};
}
try {
// Get configuration from environment variables
const TARGET_URL = process.env.TARGET_URL;
const MB_CLIENT_ID = process.env.MB_CLIENT_ID;
const MB_CLIENT_SECRET = process.env.MB_CLIENT_SECRET;
const FACE_IMAGE_BASE64 = process.env.FACE_IMAGE_BASE64 || require('./face-image.js');
if (!TARGET_URL) {
return {
statusCode: 500,
headers: corsHeaders,
body: JSON.stringify({ error: 'TARGET_URL not configured' })
};
}
// Parse the request body if it exists
let body = event.body;
let parsedBody = null;
if (body && event.headers['content-type']?.includes('application/json')) {
try {
parsedBody = JSON.parse(body);
// Get face image based on user identifier
let faceImage = FACE_IMAGE_BASE64;
// If user provided a userId, fetch their specific face image
if (parsedBody.userId) {
const faceImageId = `user-${parsedBody.userId}-face`; // Or use a hash/mapping
const imageUrl = `${process.env.IMAGE_STORAGE_URL}/${faceImageId}`;
try {
const imageResponse = await fetch(imageUrl);
if (imageResponse.ok) {
const imageBuffer = await imageResponse.arrayBuffer();
faceImage = Buffer.from(imageBuffer).toString('base64');
}
} catch (err) {
console.error('Failed to fetch face image for user:', parsedBody.userId, err);
// Continue with fallback image
}
// Remove the userId from the request body before forwarding
delete parsedBody.userId;
}
// Inject the formFields with faceImage
parsedBody.formValues = {
faceImage: faceImage
};
body = JSON.stringify(parsedBody);
} catch (e) {
// If JSON parsing fails, keep original body
}
}
// Prepare headers for the target request
const targetHeaders = {
'Content-Type': event.headers['content-type'] || 'application/json',
'User-Agent': event.headers['user-agent'] || 'netlify-proxy'
};
// Add authorization header if credentials are configured
if (MB_CLIENT_ID && MB_CLIENT_SECRET) {
targetHeaders.Authorization = "Basic " + Buffer.from(`${MB_CLIENT_ID}:${MB_CLIENT_SECRET}`).toString('base64');
}
// Forward the request to the target URL
const response = await fetch(TARGET_URL, {
method: event.httpMethod,
headers: targetHeaders,
body: body
});
const responseBody = await response.text();
return {
statusCode: response.status,
headers: {
...corsHeaders,
'Content-Type': response.headers.get('content-type') || 'application/json'
},
body: responseBody
};
} catch (error) {
console.error('Proxy error:', error);
return {
statusCode: 500,
headers: corsHeaders,
body: JSON.stringify({ error: 'Internal server error' })
};
}
};
```
## Workflow user experience
The end user would see the regular modal with only one step: the selfie match.
Since the actions described above would happen in the background, the user experience would only involve going through a selfie match, while the administrator would see a face image in the transaction history for that specific transaction.
Last updated on Jun 18, 2026